A sloppy guide to GnuCash's Python bindings
Hi! The other day I was building some script to parse some bank extracts and merge it into a GnuCash database through a Python script. GnuCash's offers some Python bindings to interact with it, but the documentation is a bit lacking.
The Python bindings can be understood looking into the sample scripts
[1]
[2]
[3]
and a bit of Python's help().
But if you want another entry point here is a bit of a sloppy quickstart to see how to open a GnuCash file, read it's transactions and add a new one.
(Note: If your file is stored in a SQL format you might be able to use piecash to access it. I can't talk about the how friendly that library is, but it's documentation is much more extensive).
(Also note: I'm not an expert user (or someone with accounting knowledge for that matter) and I won't go into how to use GnuCash generally as a software tool… maybe check it's wiki or it's Quick Start Guide For Business Users for that 🤷.)
But first…
What is GnuCash?
According to it's website…
GnuCash is personal and small-business financial-accounting software, freely licensed under the GNU GPL […]. Designed to be easy to use, yet powerful and flexible, GnuCash allows you to track bank accounts, stocks, income and expenses. As quick and intuitive to use as a checkbook register, it is based on professional accounting principles to ensure balanced books and accurate reports.
Table of contents
- What is GnuCash
- Quick overview
- Preparation
- Opening and reading transactions
- Adding a new transaction
- References
Quick overview
Before we start, and in case you end up here trying to understand how to use the library, let me show you a quick overview of how to move around the objects in the library.
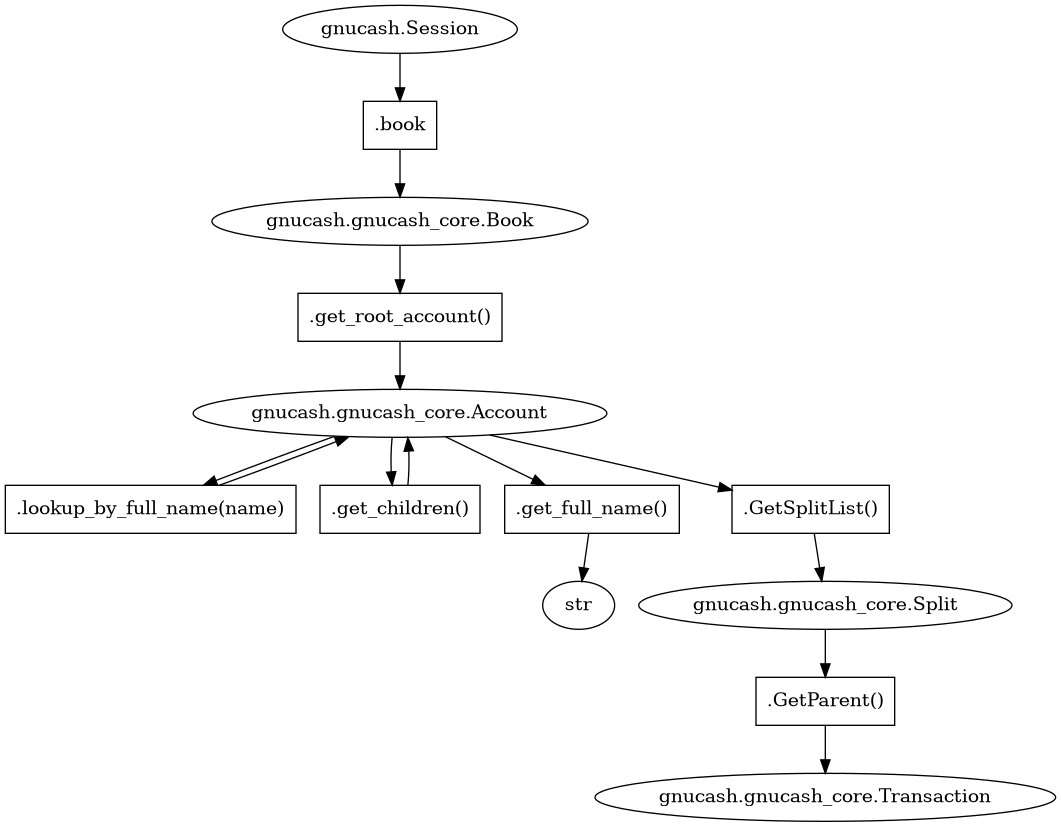
Anyway… back to the step-by-step…
Preparation
Python bindings installation
On Debian or Ubuntu-based environments it is possible to just run sudo apt-get install gnucash python3-gnucash to pull the software and Python's bindings.
Note that if you're operating on a Python virtual environment the bindings might not be found by Python's interpreter.
$ python3
Python 3.11.5 (main, Aug 29 2023, 15:31:31) [GCC 13.2.0] on linux
Type "help", "copyright", "credits" or "license" for more information.
>>> import gnucash
Traceback (most recent call last):
  File "<stdin>", line 1, in <module>
ModuleNotFoundError: No module named 'gnucash'
>>>
As a quick fix to find gnucash's bindings on your virtual environment you might want to try to copy them from your system environment:
$ cp -Rv /usr/lib/python3/dist-packages/gnucash $VIRTUAL_ENV/lib/python3.*/site-packages/
$ python
Python 3.11.5 (main, Aug 29 2023, 15:31:31) [GCC 13.2.0] on linux
Type "help", "copyright", "credits" or "license" for more information.
>>> import gnucash
>>> gnucash.__file__
'/home/kenkeiras/test/lib/python3.11/site-packages/gnucash/__init__.py'
Test file
Just so we have some common data to look at, let's pick this sample GnuCash file and use it for tests.
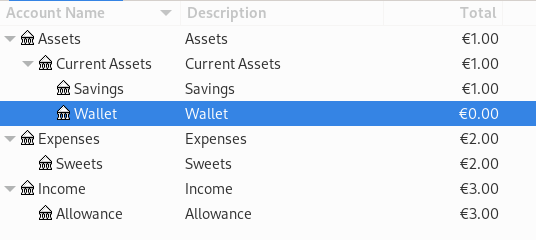
When opening it with GnuCash we can find the following accounts:
* Assets            (  1,00€)
  * Current Assets  (  1,00€)
    * Savings       (  1,00€)
    * Wallet        (  0,00€)

* Expenses          (  2,00€)
  * Sweets          (  2,00€)

* Income            (  3,00€)
  * Allowance       (  3,00€)
Opening and reading transactions
As we can see on the Quick Overview, the first thing we have to do is to open a Session.
import gnucash

with gnucash.Session("sample-file.gnucash") as session:
Anyway… after we open a Session we can pull the Book and from there, pull the "root" Account.
import gnucash

with gnucash.Session("sample-file.gnucash") as session:
    book: gnucash.gnucash_core.Book = session.book
    root_account: gnucash.gnucash_core.Account = book.get_root_account()
From that "root" Account we can either directly access the account we are interested on.
import gnucash

with gnucash.Session("sample-file.gnucash") as session:
    book: gnucash.gnucash_core.Book = session.book
    root_account: gnucash.gnucash_core.Account = book.get_root_account()
    wallet: gnucash.gnucash_core.Account = root_account.lookup_by_full_name("Assets.Current Assets.Wallet")
    print("Wallet:", wallet.get_full_name())
Wallet: Assets.Current Assets.Wallet
We can also iterate over an account's children:
import gnucash

with gnucash.Session("sample-file.gnucash") as session:
    book: gnucash.gnucash_core.Book = session.book
    root_account: gnucash.gnucash_core.Account = book.get_root_account()
    for account in root_account.get_children():
        print("Sub-account:", account.get_full_name())
Sub-account: Assets
Sub-account: Income
Sub-account: Expenses
Let's access the account with lookup_by_full_name and pull it's Splits. A Transaction is composed of Splits which are "money in" an account or "money out" an account. Normally your Transactions will have 2 Split (one for the money "out" and one for the money "in").
Let's then list the Splits in the account, get it's amount, and the description for the transaction:
import gnucash

with gnucash.Session("sample-file.gnucash") as session:
    book: gnucash.gnucash_core.Book = session.book
    root_account: gnucash.gnucash_core.Account = book.get_root_account()
    wallet: gnucash.gnucash_core.Account = root_account.lookup_by_full_name("Assets.Current Assets.Wallet")
    for split in wallet.GetSplitList():
        print("{:7.2f} - Concept - {}".format(float(split.GetAmount()), split.GetParent().GetDescription()))
   3.00 - Concept - Received allowance
  -2.00 - Concept - Bought gummies
  -1.00 - Concept - Savings to the Piggy Bank
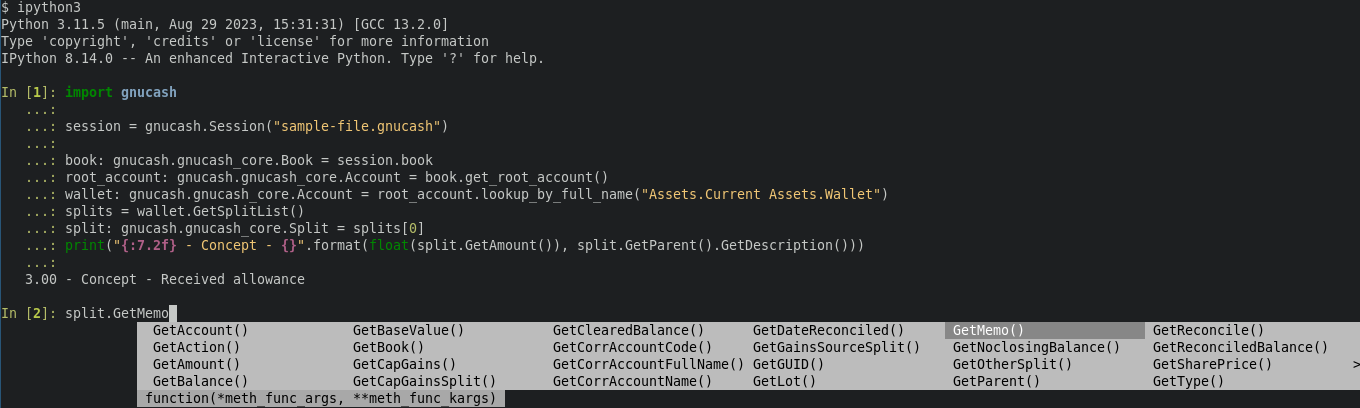
That's the general idea for reading transactions. Running this code (without with) in an IPython session is a good idea to have some objects to explore. Just remember to run session.end() when you're done.
import gnucash

session = gnucash.Session("sample-file.gnucash")

book: gnucash.gnucash_core.Book = session.book
root_account: gnucash.gnucash_core.Account = book.get_root_account()
wallet: gnucash.gnucash_core.Account = root_account.lookup_by_full_name("Assets.Current Assets.Wallet")
splits = wallet.GetSplitList()
split: gnucash.gnucash_core.Split = splits[0]
print("{:7.2f} - Concept - {}".format(float(split.GetAmount()), split.GetParent().GetDescription()))

# Remember to do session.end()
Adding a new transaction
(There's useful documentation on this, but written for C++)
Ok, now we know how to read the existing transactions, but how about creating a new one? Let's create a simple transaction to record the buy of more of those gummies.
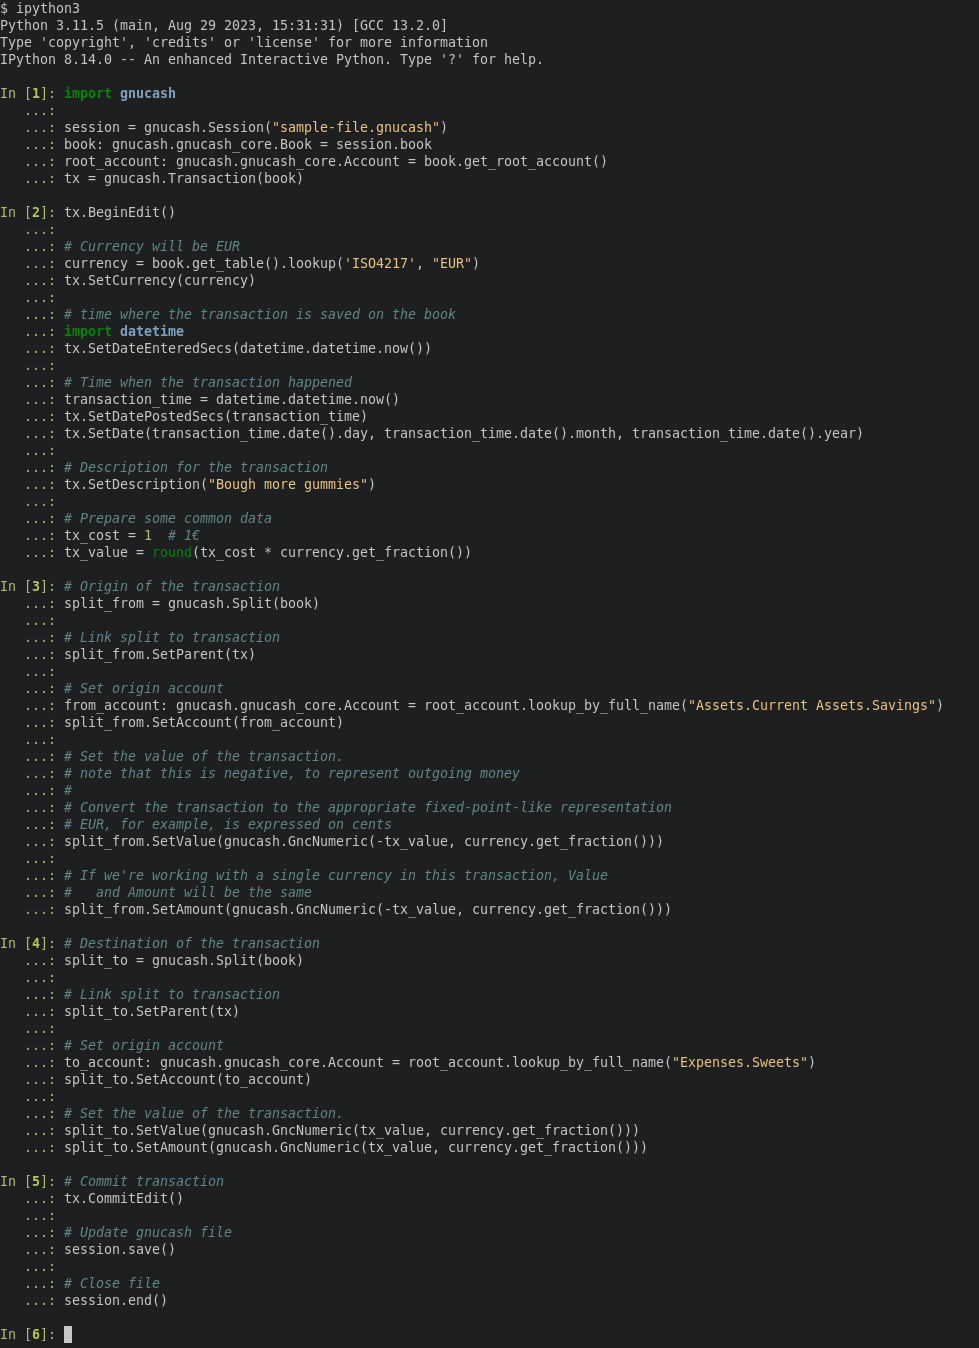
A transaction has to be created with a book as base.
import gnucash

session = gnucash.Session("sample-file.gnucash")
book: gnucash.gnucash_core.Book = session.book
root_account: gnucash.gnucash_core.Account = book.get_root_account()
tx = gnucash.Transaction(book)
Then, we can set the base information for the transaction.
tx.BeginEdit()

# Currency will be EUR
currency = book.get_table().lookup('ISO4217', "EUR")
tx.SetCurrency(currency)

# time where the transaction is saved on the book
import datetime
tx.SetDateEnteredSecs(datetime.datetime.now())

# Time when the transaction happened
transaction_time = datetime.datetime.now()
tx.SetDatePostedSecs(transaction_time)
tx.SetDate(transaction_time.date().day, transaction_time.date().month, transaction_time.date().year)

# Description for the transaction
tx.SetDescription("Bough more gummies")

# Prepare some common data
tx_cost = 1  # 1€
tx_value = round(tx_cost * currency.get_fraction())
Then, the transaction has to declare it's two splits, the origin and the destination.
# Origin of the transaction
split_from = gnucash.Split(book)

# Link split to transaction
split_from.SetParent(tx)

# Set origin account
from_account: gnucash.gnucash_core.Account = root_account.lookup_by_full_name("Assets.Current Assets.Savings")
split_from.SetAccount(from_account)

# Set the value of the transaction.
# note that this is negative, to represent outgoing money
#
# Convert the transaction to the appropriate fixed-point-like representation
# EUR, for example, is expressed on cents
split_from.SetValue(gnucash.GncNumeric(-tx_value, currency.get_fraction()))

# If we're working with a single currency in this transaction, Value
#   and Amount will be the same
split_from.SetAmount(gnucash.GncNumeric(-tx_value, currency.get_fraction()))
Do the same for the destination of the transaction
# Destination of the transaction
split_to = gnucash.Split(book)

# Link split to transaction
split_to.SetParent(tx)

# Set origin account
to_account: gnucash.gnucash_core.Account = root_account.lookup_by_full_name("Expenses.Sweets")
split_to.SetAccount(to_account)

# Set the value of the transaction.
split_to.SetValue(gnucash.GncNumeric(tx_value, currency.get_fraction()))
split_to.SetAmount(gnucash.GncNumeric(tx_value, currency.get_fraction()))
And finally, we can "commit" the transaction and save the session's data.
# Commit transaction
tx.CommitEdit()

# Update gnucash file
session.save()

# Close file
session.end()
This will produce a new transaction row

And that's it! Hopefully it was a useful way to look into how to interact with GnuCash from Python.
References
- GnuCash homepage
- GnuCash's python bindings documentation
- GnuCash example scripts
- GnuCash qif import script example
- GnuCash stock portfolio script example
- Python's help() module
- piecash python module
- piecash module documentation
- GnuCash wiki entry - Using GnuCash
- GnuCash wiki entry - Quick Start Guide For Business Users
- GnuCash wiki entry - Python binbddings
- GnuCash code documentation - Session
- GnuCash code documentation - Book
- GnuCash code documentation - Account
- GnuCash code documentation - Splits
- GnuCash code documentation - Transaction
- IPython
- How to create a Transaction using GnuCash's API on C++